Documentation / Tutorials
Storing, retrieving and displaying data in graphs
In this tutorial you will learn how to store, retrieve and display data in the graph. It is cut in three main parts, a descriptive one that explain you the API for data storage, another that introduces the viewing capabilities of GraphStream, and finally a practical one that provides a complete example on how to use the viewing and data storage APIs.
Data attributes
GraphStream defines how the graph evolves using events. These events can be separated in two categories structural and informational.
Graph structure
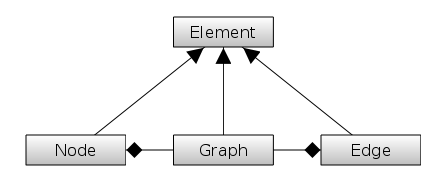
The first category relates to nodes and edges of the graph. We call it structural since it defines the structure, the topology of the graph. We call the items making the structure of the graph elements. This naming appears in the API since the Node and Edge interfaces both inherit the Element interface. We also consider graphs as elements and the Graph interface also inherits Element.
Graph information
The second category relates to the data stored on the graph, and it is why we call it informational. Data can be associated with any graph element: nodes, edges and the graph itself. We call data items attributes. One can assign any number of data attribute on any graph element. Each attribute is identified by a key. Attributes on each graph element must have unique keys. However two attributes may have the same key on two distinct graph elements.
This is the Element interface that defines storing and retrieval methods for attributes, hence this access is the same on nodes, edges and graphs. You can think of attributes stored on elements as a map between attributes keys and their values. Therefore each element can contain a key-value attribute map, but this one is not created if there are no attributes. The values can be any Object, the key must be a String.
Other ways to store data on graphs
Sometimes you want to create your own graph structure and inherit the Node and Edge classes to create your own. In this case you will probably not store the data under the form of key-value attributes but inside fields of the classes you define. Both ways, key-value or inheritance, have their advantages and drawbacks. The encouraged way to store data on the graph is using key-value attributes, but inheritance is perfectly possible and will be described in another tutorial. In the following tutorial we will focus on key-value attribute maps.
The sections under give details about the API and could be skipped at first. Go to section An example using attributes and the viewer_ if you only want a quick practical tutorial.
Storing and retrieving data attributes
As said above, most of the API dealing with attributes is defined in the Element interface, super-interface of Node, Edge and Graph. The most common method to retrieve an attribute stored on an element is::
Element.getAttribute(String key)
This method either returns the data associated with the given key or null if there is no such attribute stored on the element. We can consider that the return type of getAttribute() is Object for now, but more on this later.
Conversely, to store an attribute you use::
void Element.setAttribute(String key, Object ... values)
As you can see this method is a variable argument list method. Most often you will use it like this, suppose we have some node object n:
    Node n = graph.getNode("A");
    n.setAttribute("foo", "bar");
You then retrieve the value this way:
String value = n.getAttribute("foo");
Note the absence of cast to String in the expression.
But you are not restricted to string of characters, you can store any kind of value:
n.setAttribute("weight", 1.5);
(Also note that the key “weight” is not reserved in GraphStream, although it can be used by many algorithms). In this case, you retrieve the value this way:
double value = n.getAttribute("weight");
You can also use the setAttribute() without value:
n.setAttribute("Truth?");
This will mean the attribute acts as a boolean. In fact, the setAttribute() method will store the value true as a Boolean if there is no value. True means the attribute is present. You can then test the presence of the attribute with::
if( n.hasAttribute("Truth?") ) ...
You can also store more than one value at once in an attribute:
n.setAttribute("a lot", 1, 2, 3, 4);
This will store a java array of Object in the attribute. You therefore retrieve it this way:
Object[] array = n.getAttribute("a lot");
At any time you can remove an attribute using:
n.removeAttribute("foo");
And you can get rid of all attributes of an element using:
n.clearAttributes();
You can get a list of all the attribute keys using getEachAttributeKey:
    for(String key:n.getEachAttributeKey) {
        Object value = n.getAttribute(key);
        ...
    }
You can also use an iterator for this:
    Iterator<String> i = n.getAttributeKeyIterator();

    while(i.hasNext()) {
        Object value = n.getAttribute(i.next());
        ...
    }
Although you will probably prefer the previous method.
The return type of getAttribute
In fact the Element.getAttribute() method does not return Object, here is its real signature:
<T> T getAttribute(String key)
Its return type may seem strange at first. It is in fact the one of the variable you try to assign the value to. This means that you can write such a code:
    node.setAttribute("foo", "buzz");
    node.setAttribute("bar", new Flup());   // We assume we have some Flup available.

    String foo = node.getAttribute("foo");
    Flup bar = node.getAttribute("bar");
Indeed, attributes can be of many different types. This heterogeneity does not allows to specify any generic type when creating the elements that will store attributes. Instead the getAttribute() method returns by default an Object, but if you try to assign it to, say a String as in the example above, it will force a cast to a String without needing to write the cast.
Be careful, this does not preclude cast errors, but should avoid you some heavy notation. In fact the cast is hidden in the getAttribute() method. This means that:
    node.setAttribute("bar", new Flup());
    String bar = node.getAttribute("bar");
Will fail with a class cast exception since obviously a Flup is not a String (but would you confuse a Flup with a String ?).
Ensuring a specific attribute type
If you want to ensure the type of the attribute, you can use:
<T> T Element.getAttribute(String key, Class<T> cls);
This method will return null if the attribute is not of the correct type (or if it does not exist). This avoids you to do the checking by hand. For example:
    node.setAttribute("foo", "buzz");
    node.setAttribute("bar", new Flup());

    Flup bar = node.getAttribute("bar", Flup.class); // OK
    Flup foo = node.getAttribute("foo", Flup.class); // null, bar is a String
For some really common attribute types, dedicated methods are available. The two most useful methods are getLabel() for strings of characters and getNumber() for any kind of thing that may be stored as a Number.
The getLabel() method always return a character sequence, or null if the attribute does not exist or is not some sort of character sequence. The getNumber() method returns a double or the special value NaN (Not a Number) if the attribute does not exists of is not convertible to a number (character strings containing a number are convertible).
Avoiding null attributes
By default each access to a non existing attribute will return null (or NaN). Similarly for methods that return specific types, if the attribute exists but is not of the expected type, null is returned (or NaN, for example, a getNumber() on a character string attribute). This can be a source of errors. Therefore it is possible to ask elements to throw an exception instead of returning null.
Use:
graph.setNullAttributesAreErrors(true);
To enable null attributes checking for a given graph and all its elements. If set to true, each time you try to access a non existing attribute, or each time the attribute exists but is not of the expected type, a NullAttributeException will be thrown.
The NullAttributeException is an “unchecked” exception. This means that you do not have to enclose your
attribute accesses inside try-catch clauses.
Displaying data in the viewer: a visualisation primer
First, let us quickly describe the various rendering possibilities in GraphStream.
There exist several viewers for GraphStream, that you can download separately. However one is included with the core, this is the default viewer. Its possibilities are limited, and the goal for this viewer is to remain small and stable. For portability reasons, it uses pure Java only (Java2D rendering). However it should provide a solid base for a large set of tasks. It renders nodes as circles whose size and color can be specified individually. The edges are straight lines whose width and color can also be changed individually. A label can be printed aside the nodes and edges.
One can add to this basic representation what we call sprites. A sprite is rendered like a node and can be positioned at any place on the rendering canvas. Sprites can furthermore be attached to nodes or edges and can be placed according to the node or edge they are attached to. This can be used to model processes that travel through the graph, to add multiple labels on edges or nodes, to provide indicators of the data stored on the graph, etc.
For more advanced renderings, two other viewers will be available. One in 2D, the other in 3D. The other 2D viewer provides a lot more rendering possibilities, various node, edge and sprite shapes, images, backgrounds, gradients, arrows shapes, shadows, text styles and alignment, etc. It also uses Java2D. The 3D viewer goal is to represent a graph in the 3D space, as well as to provide a way to represent very large sets of data.
The 2D viewers output can be configured using style sheets. This allows to cleanly separate the graph data and structure from its graphical representation and style. The style sheet is very similar to the CSS language used for web pages.
Here we will learn how to change the node color and add a label on them since these operations are done using special attributes.
To add a label that will be displayed aside the node or edge on screen, you simply have to set the ui.label attribute on the corresponding Node or Edge. Changing the attribute will automatically change the text on screen, and removing the attribute will remove the label.
For example suppose you have a node n, you can add a label this way:
    Node n = graph.addNode("A");
    n.setAttribute("ui.label", "A");
The color of elements are changed in a different way. The labels are data that you store on the elements, they are parts of the contents of the graph. Indeed, structure and information both define the contents of the graph. However as this is done for HTML pages, GraphStream separates the graph representation and styling from the graph contents. One can completely change the display of the same graph using a different style. This is why the viewer uses style sheets that uses the CSS syntax well known of web developers. Colors are changed using the style sheet, and instead of specifying directly colors for node and edges, you will specify that they pertain to a style class.
You add a style sheet to a graph using the ui.stylesheet attribute. The style sheet can be a string containing the styling declarations, a file or an URL. For the sake of simplicity we will directly pass the style sheet as a string.
The CSS notation uses selectors to associate style to graph elements. A selector can be the keywords node, edge or graph for example. The style is given after the selector enclosed between braces. A style is defined by a set of pairs property-value. A property is a keyword that define which aspect of the rendering is changed. The value is defined by the kind of property. The property is separated from the value by a colon. Property-values are always terminated by a semi-colon, even if there is only one property-value.
For example to color all nodes in red (the default is black), you can use a style sheet like this:
    node {
        fill-color: red;
    }
The selector is the keyword node. This selector will apply the style to all nodes, without distinction. The style defines only one property-value pair. The changed property is the fill color, the value is a named color, here red. GraphStream knowns all named colors used in HTML. But you can also give colors using the notation:
    node {
        fill-color: rgb(255,0,0);
    }
However, most of the time you want to change specific nodes of the graph. This can be done using several techniques. One of the most easy is using style classes. You can define a style class using a specific selector:
    node {
        fill-color: black;
    }
    node.marked {
        fill-color: red;
    }
The classes apply to nodes, edges or graphs. Therefore the class selector begins by one of node, edge or graph followed by a dot and the name of the class you want to define. Then you add style properties as usual.
By default graph elements do not pertain to any class. You specify classes for individual elements using the ui.class attribute. For example, given a node n, you could write:
    Node n = graph.getNode("A");
    n.setAttribute("ui.class", "marked");
The classes are applied instantly by the viewer. Therefore you can color nodes individually merely by changing their class.
An example using attributes and the viewer
We now have enough information to proceed to the real tutorial, so enough method names and details of the API ! Lets do some real code.
In this tutorial part, we will build a graph, display it and explore it node by node, following the edges. Doing so, we will display the exploration progression using specific attributes.
In order to work we will need to import two packages and one class:
    import java.util.Iterator;
    import org.graphstream.graph.*;
    import org.graphstream.graph.implementations.*;
We will create a class named GraphExplore:
    public class GraphExplore {
        public static void main(String args[]) {
            new GraphExplore();
        }
        public GraphExplore() {
        }
    }
In the constructor we will build a simple graph:
public GraphExplore() {
Graph graph = new SingleGraph("tutorial 1");
graph.setStrict(false);
graph.setAutoCreate(true);
graph.display();
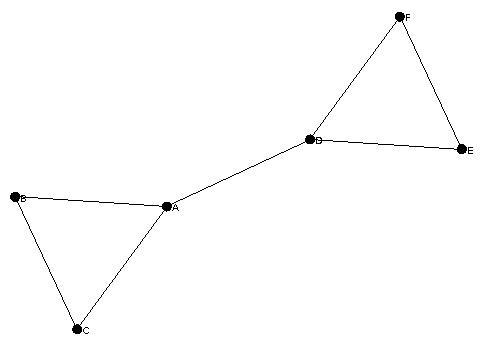
graph.addEdge("AB", "A", "B");
graph.addEdge("BC", "B", "C");
graph.addEdge("CA", "C", "A");
graph.addEdge("AD", "A", "D");
graph.addEdge("DE", "D", "E");
graph.addEdge("DF", "D", "F");
graph.addEdge("EF", "E", "F");
}
Now we are ready to explore the graph. The lines above create a SingleGraph instance, that is a graph where only one edge can exist between two nodes. Then we ask the graph to avoid reporting references to non existing nodes as errors, and instead to create them as needed. This allows us the create the graph only by specifying edges.
We also ask a display for the graph. Before adding code, it could be interesting to customize this display. We will first add labels to the nodes, add the following code after the graph creation:
    for (Node node : graph) {
        node.setAttribute("ui.label", node.getId());
    }
We use the attribute ui.label to ask the display of a text aside the node representation on screen. We merely use the node identifier as label. Most attributes that deal with the viewer starts with ui.
This graph looks like this:
Now lets try our graph exploration. The basic idea is to take a starting node and explore its neighbors in a breadth first order, changing the nodes color as we proceed. There exist several ways to explore a graph in GraphStream. One is to enumerate all nodes or edges as we did when setting the labels. Another is to follow the graph topology by exploration. The Node class provides iterators on its set of neighbors (both directed only or undirected), as well as two iterators to explore the graph starting from this node in depth-first or breadth-first order. We will use the second in a dedicated method. Add the following code after the constructor::
    public void explore(Node source) {
        Iterator<? extends Node> k = source.getBreadthFirstIterator();

        while (k.hasNext()) {
            Node next = k.next();
            next.setAttribute("ui.class", "marked");
            sleep();
        }
    }
This method takes as argument a source node from which the exploration will begin. It starts by creating an iterator in breadth first order from this source node. The iterator will yield first this source node, then all its neighbors, the neighbors of these neighbors, etc.
We enumerate the nodes in a while loop. For each node we add the ui.class attribute with value marked. This adds the node in a CSS class. This class will be used to color the nodes as we explore them. However we do not have yet a CSS style sheet for our graph. We can remedy to this problem by adding the following code after the explore() method:
    protected String styleSheet =
        "node {" +
        "	fill-color: black;" +
        "}" +
        "node.marked {" +
        "	fill-color: red;" +
        "}";
And adding the following line just before the graph.display() call in the constructor:
graph.setAttribute("ui.stylesheet", styleSheet);
The style sheet defines two selectors: node that will apply a style to all the nodes, and node.marked that will apply a style only to nodes that pertain to the marked CSS class. This way all the nodes will be colored by default in black, but nodes having the ui.class attribute with value marked will be colored in red.
We also make use of a sleep() method that is here only to slow down the exploration process so that one can follow it easily in the viewer. You can add this method just after the explore() one:
	protected void sleep() {
		try { Thread.sleep(1000); } catch (Exception e) {}
	}
By default it makes a one second pause. We now have all the parts of our program. Before you can run it. We need to add some more lines at the very end of the constructor:
explore(graph.getNode("A"));
Then we finally can use our explore() method, passing it as source node the node A.
That is all, you can now run the program. You will only need the gs-core.jar to do so. Here is the complete code of this tutorial:
    import java.util.Iterator;
    import org.graphstream.graph.*;
    import org.graphstream.graph.implementations.*;

    public class GraphExplore {
        public static void main(String args[]) {
            new GraphExplore();
        }

        public GraphExplore() {
            Graph graph = new SingleGraph("tutorial 1");

            graph.setAttribute("ui.stylesheet", styleSheet);
            graph.setAutoCreate(true);
            graph.setStrict(false);
            graph.display();

            graph.addEdge("AB", "A", "B");
            graph.addEdge("BC", "B", "C");
            graph.addEdge("CA", "C", "A");
            graph.addEdge("AD", "A", "D");
            graph.addEdge("DE", "D", "E");
            graph.addEdge("DF", "D", "F");
            graph.addEdge("EF", "E", "F");

            for (Node node : graph) {
                node.setAttribute("ui.label", node.getId());
            }

            explore(graph.getNode("A"));
        }

        public void explore(Node source) {
            Iterator<? extends Node> k = source.getBreadthFirstIterator();

            while (k.hasNext()) {
                Node next = k.next();
                next.setAttribute("ui.class", "marked");
                sleep();
            }
        }

        protected void sleep() {
            try { Thread.sleep(1000); } catch (Exception e) {}
        }

        protected String styleSheet =
            "node {" +
            "	fill-color: black;" +
            "}" +
            "node.marked {" +
            "	fill-color: red;" +
            "}";
    }
As an exercise, you could improve this program by allowing it to do the exploration several times, starting each time from the last node it visited. In this case you could color the nodes in red once, and at the next visit, color them back in black. Doing so you will need to use the Node.removeAttribute() method to remove the marked class of the nodes.