Documentation / Tutorials
Getting Started
Some words about GraphStream
GraphStream is a graph handling Java library that focuses on the dynamics aspects of graphs. Its main focus is on the modeling of dynamic interaction networks of various sizes.
The goal of the library is to provide a way to represent graphs and work on it. To this end, GraphStream proposes several graph classes that allow to model directed and undirected graphs, 1-graphs or p-graphs (a.k.a. multigraphs, that are graphs that can have several edges between two nodes).
GraphStream allows to store any kind of data attribute on the graph elements: numbers, strings, or any object.
Moreover, in addition, GraphStream provides a way to handle the graph evolution in time. This means handling the way nodes and edges are added and removed, and the way data attributes may appear, disappear and evolve.

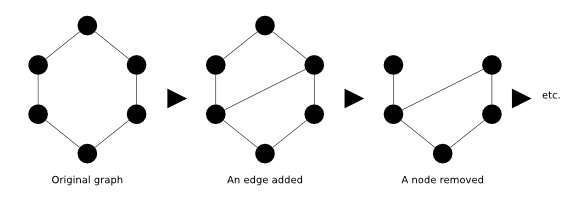
In order to handle dynamic graphs, the library defines in addition to graph structures the notion of “stream of graph events”, which as you guessed, is at the origin of the library name. The number of events is restricted they are:
- node addition,
- node removal,
- edge addition,
- edge removal,
- graph/node/edge attribute addition,
- graph/node/edge attribute change,
- graph/node/edge attribute removal.
- step
Inside the library, a lot of components can generate such streams of events. These components are called sources. Other components can receive these events and process them, they are in fact very comparable to listeners, a concept widely used in the Java world. We call such components sinks.
When a component is able to both receive graph events (sink) and produce them (source) we call it a pipe. The graph structures in GraphStream are pipes. There are many kinds of pipes, that can act as filter, removing some events, or adding more events, or allowing to cross the network, or communicate between threads.
Here is an example of an often used pipeline:

A reader reads graph events in a file and acts as a source, producing these events in order. Its output is connected to a graph. Each time a graph receives an event it modifies its structure to reflect the effect of the event. The graph is also a source, that is connected here to a viewer. The viewer accepts the events and shows a graphical representation of the graph.
Installation
Before delving into code, it is important to quickly look at the project organisation in terms of library modules.
The most important and necessary one is gs-core. It defines the base graph
classes, the graph event streaming classes and a minimalist, yet efficient, graph rendering
user interface. The goal of this library is to remain small. This module is
contained in the file gs-core-X.Y.jar, where X is the major GraphStream
version, and Y is the minor GraphStream version. This jar is
the minimal requirement.
Another important module is the gs-algo one. It provides generalist algorithms
often tied to graph libraries (shortest paths, modularity, centrality, etc.) as
well as what we call generators, that are algorithms that produce graphs with
predefined features (random, grid, scale-free, etc.). It is defined in the
gs-algo-X-Y.jar file.
Finally, we have the gs-ui modules. They provides an implementation of the
GraphStream Viewer. Their name is composed like this : gs-ui-TECH-X-Y.jar
where X is the major GraphStream version, Y is the minor GraphStream
version and TECH is the name of the GUI tech used.
More information on how to install GraphStream is found on the Install page.
A first example
It is time to test the API. Although we emphasize on the dynamics aspects of the library, it is probably better to start with a simple static graph that we will evolve afterwards, in the following tutorials.
All graphs in GraphStream follow the Graph interface. You import it with:
import org.graphstream.graph.*;
There exist several graph implementations, a versatile one is the SingleGraph
class. It provides a 1-graph (there can be only one edge between two nodes), that
can be either directed or undirected. In fact you can mix directed and undirected
edges inside such a graph, simply consider undirected edges as bidirectional. This
does not well cope with the mathematical definition, but is certainly easier to use
for developing. You import it with:
import org.graphstream.graph.implementations.*;
You create the graph this way:
public class Tutorial1 {
	public static void main(String args[]) {
		Graph graph = new SingleGraph("Tutorial 1");
	}
}
There are lots of ways to populate a graph with nodes, edges and data
attributes. In GraphStream the better way is to connect a graph event producer
to the graph (such as a loader or graph generator). However the Graph class
also provides a construction interface that allows to build the graph by
hand. This interface is mostly useful to build small examples and to experiment
with idea prototypes.
The construction API of the graph works as a factory for node and edge elements (you cannot create nodes and edges by yourself and add them in the graph, you must ask the graph to create them for you). Add the following lines after the graph declaration:
graph.addNode("A" );
graph.addNode("B" );
graph.addNode("C" );
graph.addEdge("AB", "A", "B");
graph.addEdge("BC", "B", "C");
graph.addEdge("CA", "C", "A");
As their name suggest, these methods will add three nodes and three edges between the nodes. You can see that each node or edge is identified by a string. Such identifiers must naturally be unique.
It is often useful to check the graph by seeing it. If you add :
System.setProperty("org.graphstream.ui", "swing");
you will be able to visulize your graph with the gs-ui-swing module. you can easily
do this using the display() utility method:
graph.display();
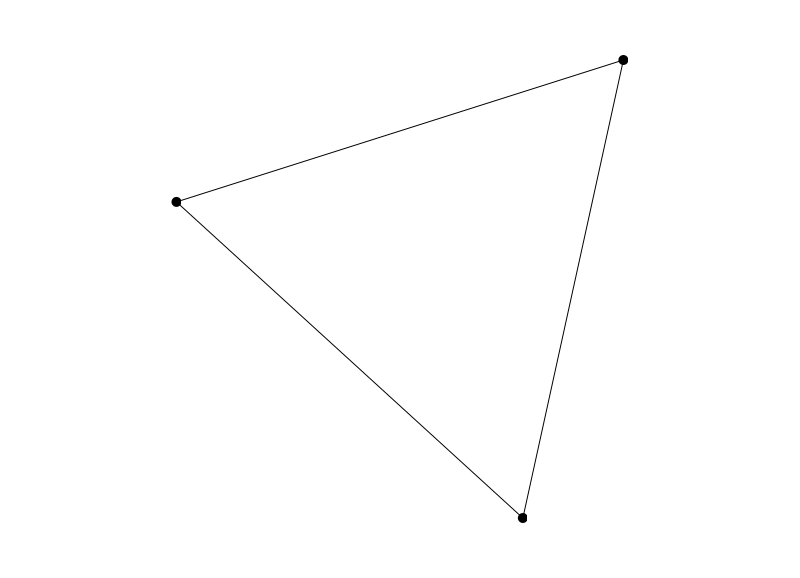
This should produce a result similar to this:

Here is the full text of the above program:
import org.graphstream.graph.*;
import org.graphstream.graph.implementations.*;

public class Tutorial1 {
	public static void main(String args[]) {
		System.setProperty("org.graphstream.ui", "swing");

		Graph graph = new SingleGraph("Tutorial 1");

		graph.addNode("A");
		graph.addNode("B");
		graph.addNode("C");
		graph.addEdge("AB", "A", "B");
		graph.addEdge("BC", "B", "C");
		graph.addEdge("CA", "C", "A");

		graph.display();
	}
}
You will find more detail about the visualisation in /doc/Tutorials/Graph-Visualisation/
The graph being a factory for node, it can create nodes automatically if needed. Instead of the graph construction seen above, you can use:
graph.setStrict(false);
graph.setAutoCreate( true );
graph.addEdge( "AB", "A", "B" );
graph.addEdge( "BC", "B", "C" );
graph.addEdge( "CA", "C", "A" );
To produce the same result. If a node is unknown, it will be created for you.
Exploring the graph structure
Each time you add a node or edge in the graph, a corresponding object is
created for you. These objects belong to the Node and Edge interfaces. As you have seen it above, you name the nodes
and edges
by an identifier under the form of a string of characters. Each identifier
must be unique since they relate to only one node or one edge.
Once added in a graph with an identifier, you can obtain a reference on these objects using this identifier:
Node A = graph.getNode("A");
or:
Edge AB = graph.getEdge("AB");
The Node and Edge interfaces then allow to obtain details on the
represented nodes and edges. For example:
- what is the unique identifier of the node or edge (
Node.getId(),Edge.getId()), - what is the degree of the node (number of connected edges,
Node.getDegree()), - what are the edges connected to a node (
Node.hasEdgeToward(String id)andNode.getEdgeToward(String id)), - is an edge directed or not (
Edge.isDirected()), - what is the node at the other end of the edge (
Edge.getOpposite(Node n)), - etc.
In addition to getNode and getEdge which impose to know the identifier
of the node or edge, the graph class provides ways to iterate on the nodes or
edges, you can write:
for(Node n:graph) {
	System.out.println(n.getId());
}
The code above allows to iterate on all the nodes of the graph and will print their unique identifier, one by line. You can do a similar thing for edges using streams:
graph.edges().forEach(e -> {
	System.out.println(e.getId());
});
In fact the for(Node n:graph) instruction is a shorthand for this
code using streams:
graph.nodes().forEach(n -> {
	...
});
Another way to access graph elements is to use their indices. Unlike identifiers which are specified when the elements are created, indices are automatically maintained by the graph. They could change when elements are added or removed but are always between zero and node/edge count minus one. The following loop iterates on all the nodes of the graph:
for (int i = 0; i < graph.getNodeCount(); i++) {
	Node node = graph.getNode(i);
	...
}
Access by index is generally faster than access by identifier. It can be useful to interface GraphStream with APIs that use arrays. The following code constructs the adjacency matrix of a graph:
int n = graph.getNodeCount();
byte adjacencyMatrix[][] = new byte[n][n];
for (int i = 0; i < n; i++)
	for (int j = 0; j < n; j++)
		adjacencyMatrix[i][j] = graph.getNode(i).hasEdgeBetween(j) ? 1 : 0;
To get the index of a node knowing its identifier, use:
int i = graph.getNode("A").getIndex();
Inversely, to get the identifier of a node when its index is known, use
String id = graph.getNode(0).getId();